Independence Day Projects
About five years ago, Julie, Steph and I went out to go to a community garage sale.
I came across a box containing two wall mounted light fixtures. They were brass and wood, with those 'flame' shaped light bulbs. I looked at the fixtures for a minute, then started to play with them. There were knurled caps that could be unthreaded, and then the whole thing fell apart. Looking at the pieces, I decided that I could pull the wiring, re-arrange the bits, and be most of the way to having a slick pair of vintage ray guns.
I paid the family the couple of bucks, and we got in the car. Before the next house, I had rebuilt one of the fixtures into my first gun, all it needed was a handle, trigger, and trigger guard.
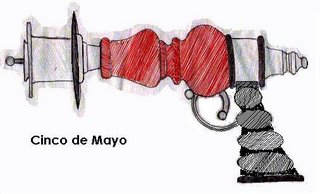
I drew a picture of the finished gun on a piece of notebook paper. At some point, I added the title 'Cinco de Mayo'.
Later that day, I went to the local Pep Boys, and bought a can of red lacquer spray paint, the kind for touching up cars. I removed the turned wooden spindle from one of the fixtures, threaded it onto a length of string so I could hang it, and carefully spray painted the wood, so as to have no drips.
Once dry, I re-assembled the ray gun, and then worked a fashioning a handle out of oak. The handle was much simpler in the origingal design, mostly long curves. I spent a couple of hours on cutting and carving the handle, and finally put it in a box in the garage with the picture, and never worked on it again.
I'd run across the project every once in a while, and I had it sitting out a couple of weekends ago when Stephanie asked me if I would every make any more ray guns again.
I hated to admit it, but I had never finished any, so the whole thing dropped back into my mind, and I have been working on how to finish it.
Here is a picture of the current plan. I scanned in the old sketch, and then tweeked the handle in Paint.
I bought some flat brass stock yesterday from a hobby shop, and hand bent a trigger guard, made of two pieces of brass sandwiched together. The brass accent ball is soldered in place as well. The trigger is non-functioning, and is made from a piece of a brass o-ring, with a brass ball soldeded on (lead-free solder).
I have two fixtures, so I made two sets of trigger guards and triggers.
I need to drill a hole for the trigger to go into, and then cut a thin slot in the wood for the trigger guard to slide into. There is a metal tube inside where the handle is, which I will solder the trigger guard to. The handle will be made of flexible polymer clay.
Next project is to start dinner on the grill.
I came across a box containing two wall mounted light fixtures. They were brass and wood, with those 'flame' shaped light bulbs. I looked at the fixtures for a minute, then started to play with them. There were knurled caps that could be unthreaded, and then the whole thing fell apart. Looking at the pieces, I decided that I could pull the wiring, re-arrange the bits, and be most of the way to having a slick pair of vintage ray guns.
I paid the family the couple of bucks, and we got in the car. Before the next house, I had rebuilt one of the fixtures into my first gun, all it needed was a handle, trigger, and trigger guard.
I drew a picture of the finished gun on a piece of notebook paper. At some point, I added the title 'Cinco de Mayo'.
Later that day, I went to the local Pep Boys, and bought a can of red lacquer spray paint, the kind for touching up cars. I removed the turned wooden spindle from one of the fixtures, threaded it onto a length of string so I could hang it, and carefully spray painted the wood, so as to have no drips.
Once dry, I re-assembled the ray gun, and then worked a fashioning a handle out of oak. The handle was much simpler in the origingal design, mostly long curves. I spent a couple of hours on cutting and carving the handle, and finally put it in a box in the garage with the picture, and never worked on it again.
I'd run across the project every once in a while, and I had it sitting out a couple of weekends ago when Stephanie asked me if I would every make any more ray guns again.
I hated to admit it, but I had never finished any, so the whole thing dropped back into my mind, and I have been working on how to finish it.
Here is a picture of the current plan. I scanned in the old sketch, and then tweeked the handle in Paint.

I bought some flat brass stock yesterday from a hobby shop, and hand bent a trigger guard, made of two pieces of brass sandwiched together. The brass accent ball is soldered in place as well. The trigger is non-functioning, and is made from a piece of a brass o-ring, with a brass ball soldeded on (lead-free solder).
I have two fixtures, so I made two sets of trigger guards and triggers.
I need to drill a hole for the trigger to go into, and then cut a thin slot in the wood for the trigger guard to slide into. There is a metal tube inside where the handle is, which I will solder the trigger guard to. The handle will be made of flexible polymer clay.
Next project is to start dinner on the grill.
posted by SquidgePa at 3:22 PM
![]()
![]()

0 Comments:
Post a Comment
<< Home