Saturday, July 29, 2006

Saturday Night

The kiln tripped at about 2:00 this afternoon. The garage is very hot, due to the kiln, but I had to work on cutting some brass and soldering this afternoon. I am making a brass plate that fits at the bottom of the grip on each ray gun. The pieces are held to the bottom of the orthoganal stems with a knurled brass cap that I bought in the lamp section at the Loewe's. The hollow tubes that hold the ray guns together are all three eighths inch with fine threads at the ends. Most lamp parts match this size, but finding anything in the screw and fastener section of hardware stores doesn't bring much luck.

The butt piece on each gun is two rectangular pieces of brass, one slightly smaller than the other. There is a hole in each piece, drilled out to three eighths, and then the holes are lined up, and the pieces soldered together. I solder on top of a scrap kiln brick on top of the kiln, and things were really hot out there today with the kiln cooling down.

Hopefully, I can sculpt the handles this week.

Bisque Fire - Dragons and Rockets

We have the kiln loaded about 2/3rds. There are several rockets, all of my closed forms, and Julie has some wonderful dragon pieces, including a large pitcher and a teapot with matching cups out of porcelain.

We candled the kiln overnight, since we were uncertain whether my rockets were a hundred percent dry. Candling warms the kiln enough to drive the physically bound mositure out of the clay. In our case, overnight is about seven hours, since Buffy woke me up for some unknown reason this morning at six thirty.

I used a hand mirror to check for mositure. The lid of the kiln is propped open with a piece of fire brick, so I slipped the mirror under the lid, and checked to see if there was any condensation on it. There was none, so I turned all of the switches on the kiln to low, and closed the kiln.

Two hours later, I again checked for moisture. I had to use my kiln gloves, since the handle on the lid is getting hot. Again, there was no moisture. I turned the bottom bank of kiln elements onto medium. Checking our firing log, we will turn up one bank of elements every hour, working from bottom to top, until they are all on high.

I bought some brass from a hobby shop during the week on the way home from work. More stuff for the ray gun handles.

Sunday, July 23, 2006

The Weekend

We did a lot of yard work this weekend. There has been a rather large pile of mulch in our driveway that has had me parking my truck out on the street for well over a month, which is now distributed over the yard. Steph spent a couple of hours pulling weeds (working off her Nintendo DS debt, with the virtual dog software that she is running on it.) Julie has been everywhere, scrubbing the stairs, leveling sand, placing flagstone, and directing my work as well. I mainly shovelled mulch, and wheeled it around in the garden cart.

Yesterday morning, I was able to return to the studio and finish my pieces. I trimmed the last of the little closed forms, as well as put another rocket together. It looks fairly clean, where most of the things that bug me about my pottery were worked out in the raw clay before it is fired. These include things like beveling the edges of the wings, keeping the wings strait instead of accidently warping them through handeling, making sure that the marks in the piece where the fins have been joined are smooth rather than being able to see the scoring marks, having all three engines be the same size, joining the engines so that they point symetrically, making sure that the fins form a level surface when the piece is finished and standing on its tail.

Three weeks until vacation. We need to fire the kiln at least twice before then, and then fire the raku kiln three or four times.

Tuesday, July 18, 2006

Big Big Rocket

I finished the big rocket tonight.

The humidity has been really high for the last week, so everything is taking forever to dry enough for carving.

On Saturday, Stephanie and I drove down to the Shore, Long Beach Island. She played in the waves for about six hours, with a break for a late lunch. We went to a nice sea food restaurant, where she had mako shark, and I had fresh scallops (harvested from the bay), which were in a pesto sauce with mushrooms, artichoke hearts, sundried tomatos, and mozarella cheese. Steph had a side of onion rings, and I had diced tomatos in basalmic vinegar.

At dusk, we learned to beach comb for sea glass.

Today, I had spent a few minutes at work on my whiteboard, sketching fin configurations until I found something that I liked. I kept trying to force a pair of stubby rectangular fins onto the mid body (I've only made one rocket where it looked good, which promptly blew up in the firing because I forgot to put a hole to the sealed center cavity..... uh, wait a minute.....needle tool through rear of rocket. The Big Rocket made a sucking noise as the pressure equalized.)

Three engine bells and fins. The cockpit windows are two rows of three rectangles. I carved two sets of intake vents between the top and side fins.

Its almost too tall to fit in its chuck in the damp box. I have it wrapped in plastic to slow down the drying. Tomorrow, I'll do the smaller rocket, and trim the closed forms and little vase.

Thursday, July 13, 2006

Tres Balls

The pieces were too wet for trimming last night. I pulled them out of the damp box, removed the plastic, and let them sit out for an hour to promote drying.

I threw three more of the ball shapes. Each one starts as a lump of clay about the size of a tangerine (or a jing char siu bau). Center the clay, open it up, raise the walls to a few inches, then collar the piece in. As the neck narrows, the rim goes ragged, so I trim it with my needle tool.

I collar until I have a small opening, then use a rib to define the square corner between the ball and the short stem that the opening is in. I also use the needletool to make the hole perfectly circular.

I use a concave rib to shape the outside of the piece, and make it more spherical. This can also involve gouging out clay that formed the base of the cylinder wall against the wheel head, and then using the rib to continue the curve of the exterior into the gouge.

I use the edge of a rib to put three concentric circles around the stem, stop the wheel, and do a one handed lift to a board for drying.

I have a page of notepaper where I sketched fifteen or so variations of what I could do with the ball shape, drawn months ago, and I'll choose three for implementation. Some are carved, like turbines, some have faces and ears, some are just statements of glazing effects.

Tuesday, July 11, 2006

Back to the Studio

I finally got back in the studio this afternoon, right after work.

It took me a while to find the raku clay. I had built a set of shelves that we have placed just outside of the studio, with all of the boxes and bags of clay on it. It probably has six or seven hundred pounds of clay on it (its built of scavenged two by fours, held together with long deck screws). The raku clay was still in the studio, but hiding under one of our little tables. Julie had to tell me where to find it.

We have a bag and a half of soft raku clay, and several bags of dried out clay that I need to reconstitute. I cut off about a six pound hunk, a quarter bag, gently bounced it into something like a cylinder against the wheel head, and started to throw.

The clay has this musty and moldy smell to it that I always am surprised by when I've been away for a while. Its a happy smell for me. Its very earthy, like good soil.

I've been drawing pictures of rockets for a few weeks now without having a chance to throw, so it was fun to try to throw something specific.

My first piece was a rocket. Its bigger and longer than my regular rockets, along the lines of the Terra-5 from Space Patrol. The rocket body is thrown as a tall cylinder, and then the rim is collared in to a point. This traps a pocket of air within the body, so that the entire form of the rocket can be manipulated without fear of collapsing the cavity inside. Usually in clay, a push from the outside of a cylinder is matched by a supporting hand on the inside, and vice versa.

A piece is removed from the wheel head by first passing a cutting wire under the foot of the piece, pulling it as tight as possible so that the wire doesn't bow up under the piece. A squeeze of water is then put on the wheel head, and the wire is used to pass that under the piece. If the piece is small, it can be lifted off of the wheel head with the tips of your fingers cradling the piece, or, for larger pieces, the splash pan can be removed from the wheel, and the piece can be slid off of the wheelhead to a board covered in wet newspaper.

I tried to cut corners, and set a board next to the piece on the wheel head, and then tried to lift the rocket body clear. It was tall and tippy, so it fell over, and got flat on one side. Since the cavity inside is trapped air, the piece did not collapse. I was able to pat the piece back into shape, and then put it back on the wheel to remove most of the imperfections.

Each rocket needs a drying chuck and engine bells. I threw three large bells for the rocket.

My second piece is a smaller, fatter rocket, more like the ones that I threw at the beginning of the year. This one received three engine bells, and a small chuck.

The third piece is a small, skinny vase, with a collared shoulder and raised rim.

The fourth piece is a bit hard to explain. It is a spherical shape, about the size of a large Christmas ball ornament. It even has a stem like a ornament, but larger. Its too heavy to be an ornament, but it is a pleasing base shape, and I think of it more like a flower pot for a single flower, or maybe with a bit of frayed steel cable sticking out. I plan to make a whole series of these ornament sized things, and one day at lunch drew sketches of a whole family of them. This one will end up as a little jack-o-lantern, and be metallic copper when it is done, sort of like those pumpkins in the Spiderman movies. I may even do one out of cassius.

Saturday, July 08, 2006

Steps, Pedals, and Rayguns

Today, Julie worked on the steps out front.

She had gone to a tile store, and bought some nice tile from their clearance room. She broke them into pieces, and added some sea glass, shells, and broken pottery from rejected pots. She layed out patterns of shards to attach to the risers of the stairs.

When she worked at deciding what shards would go where, I worked on my rayguns. I used a box cutter and a small drill in my cordless screwdriver to carve out the groove that the trigger guards would go into in each raygun. I carefully used the boxcutter to cut the surface of the wood, and then used the drill to go deep. Between the box cutter and a metal pick from my tool box, I created two fairly clean groves. I also drilled a hole for the trigger. I started small, and worked my way up through the bits until the hole was big enough.

I brought the trigger guards out into the garage, wrapped the edges in cloth, and then clamped them into my bench vise (the cloth is to keep the vise from scratching the surface of the metal). I used a hacksaw to cut the trigger guards to the right length to fit into the grooves, arch over the trigger, and then touch the orthogonal metal stem on the ray gun. The orthogonal stem will be surrounded by the handle when the raygun is complete.

I tore long strips of aluminum foil to wrap around the wood of the guns, to shield them from the heat of my torch when I soldered. I used three layers, with air gaps between. I needed to solder the trigger guards while they were in place because the angle between the trigger guard, wood body of the raygun, and orthogonal stem of the raygun needed to form a tight triangle, and I had doubts about my ability to torch the guards on free hand.

Here is a picture of what one of the wall sconses looked like before I started. I pieced this together this morning, Julie took pictures, and later I realized that I had assembled the piece slightly incorrectly, but it gives an idea of what I started with:

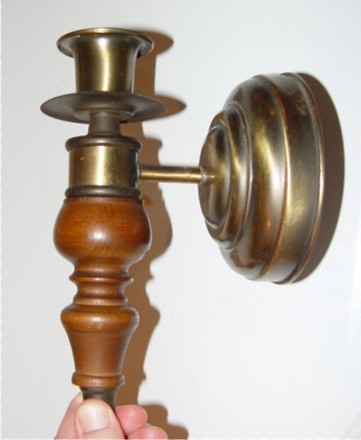
The correct assembly for the wall sconse would have the flared pan for candle drips moved down to just above the dark ring above the orthogonal stem.

From the side, it looks a bit like a phaser pistol from the original Star Trek series, but with a Victorian flair.

Here is a picture of what the rayguns look like now:


Second half of the afternoon, I helped Julie hand mix eighty pounds of morter. She worked outside, mudding the shards and applying them to the steps. On the tops of the steps, she mortered decorative pavers.

It dirty work. Each piece needs to be 'buttered' on the back with morter, then applied to the surface of the wall. Morter is pushed between the pieces, and then a heavy wet sponge is used to smooth the morter and clean the face of the shards.

The decorative pavers seemed to involve lots of whacks with a rubber mallet, to get the morter to comress underneath so they can be correctly leveled.

She did three steps today. We have two more bags of morter, and the tree biggest steps to do.

I moved buckets of water, fetched drinks, and set up a fan to keep her cool. I also puttered around in the garage, straitening things up on the workbench, and fabricated a base plate for the foot pedal to Julie's flex shaft. Every time she uses it, she gets a shock because the cover on the bottom of the pedal was lost. I cut a piece of masonite to the right shape for the base plate, glued and screwed a small wooden block to it, then added four peg feet. I used a screw to go through the top of the pedal case into my block of wood to hold the new base plate on.

Tuesday, July 04, 2006

Independence Day Projects

About five years ago, Julie, Steph and I went out to go to a community garage sale.

I came across a box containing two wall mounted light fixtures. They were brass and wood, with those 'flame' shaped light bulbs. I looked at the fixtures for a minute, then started to play with them. There were knurled caps that could be unthreaded, and then the whole thing fell apart. Looking at the pieces, I decided that I could pull the wiring, re-arrange the bits, and be most of the way to having a slick pair of vintage ray guns.

I paid the family the couple of bucks, and we got in the car. Before the next house, I had rebuilt one of the fixtures into my first gun, all it needed was a handle, trigger, and trigger guard.

I drew a picture of the finished gun on a piece of notebook paper. At some point, I added the title 'Cinco de Mayo'.

Later that day, I went to the local Pep Boys, and bought a can of red lacquer spray paint, the kind for touching up cars. I removed the turned wooden spindle from one of the fixtures, threaded it onto a length of string so I could hang it, and carefully spray painted the wood, so as to have no drips.

Once dry, I re-assembled the ray gun, and then worked a fashioning a handle out of oak. The handle was much simpler in the origingal design, mostly long curves. I spent a couple of hours on cutting and carving the handle, and finally put it in a box in the garage with the picture, and never worked on it again.

I'd run across the project every once in a while, and I had it sitting out a couple of weekends ago when Stephanie asked me if I would every make any more ray guns again.

I hated to admit it, but I had never finished any, so the whole thing dropped back into my mind, and I have been working on how to finish it.

Here is a picture of the current plan. I scanned in the old sketch, and then tweeked the handle in Paint.


I bought some flat brass stock yesterday from a hobby shop, and hand bent a trigger guard, made of two pieces of brass sandwiched together. The brass accent ball is soldered in place as well. The trigger is non-functioning, and is made from a piece of a brass o-ring, with a brass ball soldeded on (lead-free solder).


I have two fixtures, so I made two sets of trigger guards and triggers.

I need to drill a hole for the trigger to go into, and then cut a thin slot in the wood for the trigger guard to slide into. There is a metal tube inside where the handle is, which I will solder the trigger guard to. The handle will be made of flexible polymer clay.

Next project is to start dinner on the grill.

Monday, July 03, 2006

Third of July Planning

We've been grilling a lot lately.

For dinner tomorrow, we are going to grill Greek chicken. We had Greek chicken legs on Saturday, so this time we are going to branch out and do wings as well.

The recipe is adapted from a boneless lamb kebab recipe from a cookbook by The Ladies of the Philoptochos Society Holy Trinity Greek Orthodox Church, in Charleston, South Carolina.

Chicken legs run about ninety-nine cents a pound, so its an inexpensive cut of meat to feed the family.

Greek Chicken
Four pounds or so of chicken parts (use your favorite bits)
1/2 cup oil
1/2 cup wine vinegar
1/2 cup fresh lemon juice (about two big lemons)
2 or more cloves garlic, crushed
4 teaspoons salt (double to be authentic)
1/2 teaspoon pepper
1 Tablespoon oregano (or just 'Oregano', as the recipe calls for)

Combine all ingredients. I mix everything but the meat in a bowl, then pour over the meat that has been artfully arrange in a rectangular storage container, one big enough so that there is only one layer. Marinate the meat six hours or over night in the refridgerator, turning at least once to coat all sides.

Grill using your favorite method. It helps if everything is the same cut (say all legs, wings, thighs, or breasts) so they all cook the same amount of time.

---------------------------------------------------------------
I'm working the trigger and trigger guard for my ray gun. I went to several hobby shops, and bought some brass strips, tube and rods. I've got some little brass balls around. I'll bend, cut and weld them together, then make the handle for the ray gun out of a bendable polymer clay. It will provide a durable handle, but will not shatter if dropped, since the cured surface bends like rubber. I can then spray paint the handle to match the rest of the gun.